[Answer ID: 14913]
How to Reset the Password for the LinkStation
To reset the password for the LinkStation, initialize the LinkStation to its factory default with the function button.
| Note: | For LS-XL, initialize the LinkStation from Settings. |
LS-VL, LS-XHL, LS-CHL, LS-WVL, LS-WXL, LS-WSXL
HD-HLAN, HD-HGLAN, HS-DGL or LS-LGL
| 1. |
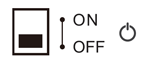
Turn off the LinkStation. To turn it off, move the switch to the “off” position and wait for the unit to fully shut down.
|
| 2. |
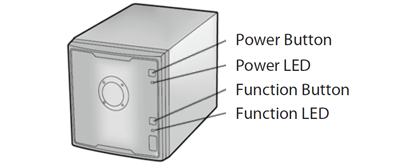
Turn the LinkStation on with holding down the function button. The function LED will flash white.
|
| 3. |
Press the function button again while the LED is flashing.
|
Notes:
| • | The following settings will be initialized: admin username, admin password, IP address, and Ethernet frame size. |
| • | To disable initializing username and password, navigate to [Management] - [Restore/Erase] - [Init Button Settings] and select "Keep current admin username and password". |
| 1. |
Move the power switch to the off position to shut down the LinkStation.
|
| 2. |
Move the power switch to the on position while holding down the function button. The function LED will flash blue for a minute.
|
| 3. |
While the function LED is flashing blue, press the function button again. This starts the initialization process. It might take 2-3 minutes. The status LED will flash amber during initialization.
|

Notes:
| • | The following settings will be initialized: admin username, admin password, IP address, and Ethernet frame size. |
| • | If you do not want to initialize the admin password when you initialize the LinkStation, select [Keep current admin password] in the [System] - [Restore/Erase] - "Restore Factory Defaults" screen, then click [Save]. |
| • | If you choose not to initialize the admin password from the function button, you can no longer configure the LinkStation if you forget the password! Write your password down and put it in a safe place. |
| 1. |
Hold down the power button for three seconds to shut down the LinkStation.
|
| 2. |
Turn on the power button while holding down the function button. The function LED will flash blue for a minute.
|
| 3. |
While the function LED is flashing blue, press the function button again. This starts the initialization process. It might take 2-3 minutes. The power LED will flash amber during initialization.
|
Notes:
| • | The following settings will be initialized: admin username, admin password, IP address, and Ethernet frame size. |
| • | If you do not want to initialize the admin password when you initialize the LinkStation, select [Keep current admin password] in the [System] - [Restore/Erase] - "Restore Factory Defaults" screen, then click [Save]. |
| • | If you choose not to initialize the admin password from the function button, you can no longer configure the LinkStation if you forget the password! Write your password down and put it in a safe place. |
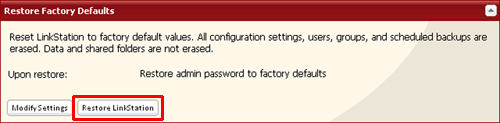
To initialize the LinkStation to its factory defaults, follow this procedure.
| Note: | All settings are restored to their factory defaults. Saved data is not erased. |
| 1. |
In Settings, navigate to [System] - [Restore/Erase] - [Restore Factory Defaults].
|
| 2. |
Click [Restore LinkStation].
|
| 3. |
The “Confirm Operation” screen will open. Enter the displayed number, then click [Apply].
|
| 4. |
The LinkStation will be restored to its factory default settings. |
Hold down the init button on the rear for 10 seconds. The LED will flash. All settings are restored to their factory defaults.
Hold down the red button for 10 seconds. The LinkStation will beep (no beep for LS-W TGL/R1). This initialize the LinkStation password and IP address to its factory defaults.
Details